LIDAR Payload DJI
The best LIDAR payload DJI Zenmuse L1 has its own parameter recommendations & FAQs that we can follow to maximize its performance. Here’s the review.
In this blog article, We will learn together about the 17 parameters and 7 FAQ about the best LIDAR payload DJI Zenmuse L1.
1.Use the latest LIDAR payload DJI Zenmuse L1 firmware version: v02.04.01.08
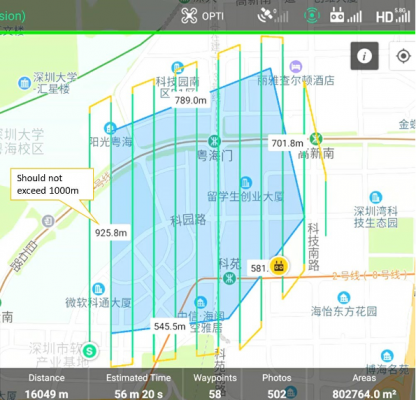
2. Plan the target area. In DJI Pilot App, go to mission planning – create a route – mapping, draw the target area on the map. Due to IMU calibration requirements in every 100s, the longest single flight route should not exceed 1000m (considering the recommended speed of 10m/s). If you have a large area, please split it into smaller zones.

3. Select Camera: LIDAR payload DJI Zenmuse L1 for mapping;
4. Calibration Flight: need to be turned on, in order to perform IMU calibration during the flight.

5. Flight Route Altitude: 50-100m is recommended; for forestry application you may use 100-150m but with lower accuracy.
6. Target Surface to Takeoff Point: you can keep default “0”.
7. Takeoff Speed (speed from the takeoff point to the first waypoint): you can keep the
default 10m/s.
8. Speed: 5~10m/s is recommended;
9. Upon Completion: Return To Home is recommended;
10. Advanced Settings. For the side overlap using LIDAR payload DJI Zenmuse L1 on 50%.

For the course angle, you can keep the default. For the margin, it can be set according to your need. For the photo mode, you can keep default on “Time Interval Shot”.
11. Payload Settings, for echo mode you can use triple if you are doing topographic survey or forestry application, and for the other applications, we suggested you to use dual mode. For the sampling Rate 160kHz for triple returns, and 240kHz for dual returns. For the scanning mode, repetitive scan is recommended for higher accuracy and for the RGB coloring, you need to turn this option on to obtain the colorized point cloud.
12. Save the mission.
13. Other settings. RGB camera setting: S mode (shutter priority) is recommended, you can adjust the parameters according to the environment. Mechanical Shutter and Dewarping should be enabled. RTK: You need to have RTK FIX during the flight to be able to make lidar post-processing and obtain the point cloud.
14. Pre-flight: Power up the M300 RTK with the LIDAR payload DJI Zenmuse L1 on the ground to warm up the system, wait until the notification pops up

15. Execute the mission
16. Post-processing: Use the latest DJI Terra firmware version: V3.0.4. Select the folder with the LIDAR payload DJI Zenmuse L1 data. Select the Output Coordinate System: you need to select a system with projection such as the UTM system, in order to use the point cloud for processing in other software. Optimize Point Cloud Accuracy: you can enable this option if you are using DJI Terra Pro or more advanced versions.
17. Start Processing.
DJI ZENMUSE L1′ BEST PAYLOAD LIDAR FAQ

After we have seen together, that there are 17 parameters that will maximize the DJI Zenmuse L1’s best LIDAR payload, then the questions related to the DJI Zenmuse L1 will be summarized in the best LIDAR payload FAQ in the article below.
When operators using the DJI Zenmuse L1’s best LIDAR payload, users might be find some questions about this LIDAR payload DJI. . Here are 7 of the most frequently asked questions about the DJI Zenmuse L1’s best LIDAR payload.
1. What are The Possible Causes for The Inaccuracy?
- Please check that IMU calibration is correctly performed before and after the mission, and every 100s during the mission. If the calibration flight is enabled, it will be automatically calibrated during the turn, so please ensure that a single route does not exceed 1km (10m/s speed).
- Please check that point cloud accuracy optimization is enabled when performing reconstruction in the DJI Terra.
- Please check that the parameters are set correctly, and try different parameters combinations. Such as altitude is recommended to set from 50 to 100m (the higher the flight, the worse the accuracy, linearly decreasing)
- Please check that RTK is always fixed during flight, or there is base station data that can be used for PPK processing.
- Repeat scanning can improve the quality of the model.
2. L1 Can’t Use Terrain Follow Mode when Enabling Calibration Flight
At present, terrain follow mode and calibration flight cannot turn on at the same time, so after turning on terrain follow mode, manually calibration flight before and after mapping mission is required. (Press figure 8 on the screen).
3. Does L1 support PPK processing?
L1 support PPK post processing, the work flow is as follow:Work with D-RTK2
- Set up D-RTK 2 at a known point and keep the measuring rod in contact with the ground. On the M300 RTK settings page, select D-RTK 2 and change its status to Mode 5. Then, pair the drone with D-RTK 2. In the app, go to the Advanced Mode (password is 123456 by default). Modify D-RTK 2’s coordinates to the coordinates of the known point. For elevation configuration, it should add 1.8 meters device height to the elevation of the known point on the ground.
- After setting up the D-RTK 2 base station, disable RTK in pilot mode and switch to GNSS flight mode. After data collection for the mission is completed, copy the .DAT file with the corresponding time slot from D-RTK2 and rename the file name to DJI_YYYYMMDDHHMM_XXX.RTB.
- Paste the file in the same folder as the raw point cloud data, then DJI Terra can automatically perform PPK post-processing.
How about if you are working with the third party RTK station?
After setting up the third-part RTK station, disable RTK in pilot mode and switch to GNSS flight mode. After data collection for the mission is completed, copy a third party base station’s data with the corresponding time slot and rename the file. Third party base station file format supports: OEM, UBX, Rinex, RTCM, but first users must rename the base station observation file name to:
- Oem format: DJI_YYYYMMDDHHMM_XXX.oem
- Ubx format: DJI_YYYYMMDDHHMM_XXX.ubx
- Rinexformat: DJI_YYYYMMDDHHMM_XXX.obs
- Rtcm format: DJI_YYYYMMDDHHMM_XXX.rtcm
- Supported format below:

After renaming the file, paste it to paste the file in the same folder as the raw point cloud data, then DJI Terra can automatically perform PPK post-processing.
4. Is there any Difference between Figure 8 Calibration and Backwards/Forwards Calibration?
In terms of effect, there is no difference between the two options. Both the two option can correctly calibrate IMU and it will only remain backwards/forwards calibration in the next firmware version.
5. What is The Rate of Degradation of The Calibration over The 100 Seconds of Linear Flight?
With the increase of flight time, the degradation becomes larger. Over 100s, the degradation is about 5-10cm per 100s, so please avoid it.
6. Why Pointcloud Suspended in The Sky?
In a rainy day, the raindrop may reflect enough of the beam back to the receiver, which may cause noise point.
7. Why Third-party Pointcloud Post-processing Software Cannot Show Pointcloud Generated by Terra?
Some point cloud software only supports viewing under projected coordinate systems. If the geodetic coordinate system (such as WGS 84) is selected when generating the point cloud, the error will occur. It needs to select a projected coordinate system (like UTM) in Terra and reconstruct it again.
Learn more about LIDAR payload DJI Zenmuse L1 on DJI Enterprise page.
Questions? Please let us know how we can help.
Connect further with us by filling the contact form below, or at:
Email: enterprise@halorobotics.com
WhatsApp: +62811-8549-888
